ALLDATA_J1 - Instructions
SPREADSHEET HANDICAPPING - INTO THE FUTURE
AllData_J1 is the future of Excel spreadsheet handicapping.
Prior to "AllData NI Beta", comma delimited data files could not be imported into Excel without using another application to parse Brisnet's or TSN's comma delimited data files. Due to column limitations in Excel versions prior to Excel 2007, Brisnet/TSN single file data files could not be imported because there is only 256 columns, in those earlier versions of Excel, while the Bris/TSN data files contain 1435 data fields which meant that in order to import all 1435 data fields you needed 1435 columns in Excel. I created a special control file, for use with a parsing utility called "Infotran", in order to allow the importation of all 1435 data fields into Excel versions prior to the 2007 version, and, it worked great except,the user had to learn how to use "Infotran" before being able to import the data.
With "AllData-NI Beta", "Infotran" was no longer needed. All importation was accomplished within AllData-NI. This advanced innovation is the handiwork of a handicapper and talented Excel user named Harry. Harry goes by the name "Hcap" on the Pace Advantage forum. By using VBA (Visual Basic for Applications), Harry was able to accomplish the importation of all 1435 comma delimited data fields into Excel. This accomplishment marked the beginning of a new, exciting generation of "AllData PPs".
We went through a lengthy period of Beta testing with the "Beta" version of AllData NI. Most, if not all of the "bugs" were fixed during that period, thanks to our users' participation in the beta testing.
While all this was going on, I and Harry, were also working on AllData's next version, we called it "AllData NI Pre2007_Batch". The "Batch" tells the tale. Through Harry's immense efforts, AllData was transformed from a rather basic, albeit unique, handicapping spreadsheet, to a more robust one, with the introduction of "batch processing" of race card data files and results files, all run automatically by Harry's VBA code.
Note: the latest "NI Batch" version is named "AllData_J1c". This version of AllData NI_Batch allows the importation of not only Brisnet/TSN data files, but also, JCapper/HDW data files. We have modified AllData because JCapper/HDW offers and "unlimited" download plan for about $90 per month, with no long term contract being required. JCapper/HDW data, according to many, is superior to Brisnet/TSN data files. But, the user can use either file type he/she chooses, even mixing the file types if they choose.
Why do we need batch processing? We need it because we have released a huge addition to the AllData Project, the "AllDataBase" racing database, which runs in conjunction with the "Batch" version of AllData PPs, enabling the user to store many AllData NI or AllData_J1 processed race cards and results files, select as many of them as the user desires, query/filter the data by more than 60 factors, plus, combinations of these factors, analyze those results, store promising settings, and, recall those stored settings for use in daily play.
Instructions for AllData_J1.xls
The following screenshots and instructions explain the use of AllData_J1.xls

The 'Main' worksheet tab. Click it and read the following instructions
The "Main" worksheet
Creating folders for your race card and results files - "Main" worksheet
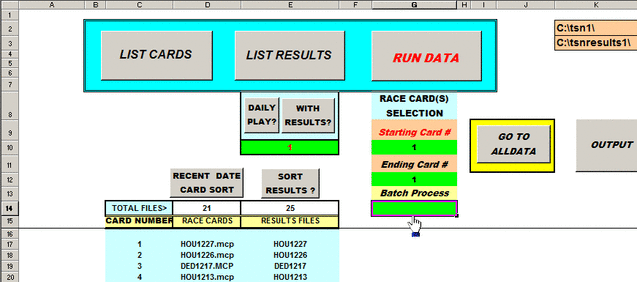
Create 2 new folders on your computer's "C" drive. Name the first one: tsn1
Name the 2nd one: tsnresults1
Then right click on the tsn1 folder and select "Properties". When the "tsn1" Properties window pops up, click the "General" tab. In the text box at the top you should see this: tsn1 , look below this box until you see "Location". To the right of "Location" you should see this: C:\ . When you join these 2 things together you get the complete "file folder path" for the folder, which would be this: C:\tsn1 .
Now do the same thing for the tsnresults1 folder, you should see tsnresults1 in the text box at the top of the Properties window, and you should see C:\ to the right of "Location". So, when combined, the complete "file folder path" would be: C:\tsnresults1 .
Now, open "AllData_J1.xls" and follow the next set of instructions. (Note: If you do not have the "_J1" version of AllData please go to the "AllData NI Batch - Download" page and download it.)

AllData_J1 requires that race card data files and results data files be put in specific folders, on your computer. However, you can create your own folders, anywhere on your computer you wish, as long as you "tell" Excel where they are located. Above, in the screenshot, are 2 folder paths. The top one, "C\tsn1\", is the default file folder path for race card data files. The bottom one, "C\tsnresults1\", is the default file folder path for results data files. You can change which folders you want to use by simply clicking in these 2 cells and typing in the exact file folder path for your personal folders.
NOTE: the file folder path must include the ending "\" in order to work.
Once you have changed your file folder paths ( or, you can use the default folders by creating new folders, on you "C" drive, named "tsn1" and "tsnresults1"), you are ready to load a race card (and results file, if the race has been run and you have downloaded the Brisnet "Exotic Results" (.xrd) for that race card).
Listing, selecting, and importing data files

To list the race cards in your race card folder, simply click the macro button named: "LIST CARDS". This macro will erase the listings starting in cell D17 and replace them with what is now in your race card folder.
To list the results files in your results folder, simply click the macro button named: "LIST RESULTS". This macro does the same thing as the previous button only it clears the results files listings starting in cell E17 and replaces them with all the results files now in your results folder.
To list the results files in your results folder, simply click the macro button named: "LIST RESULTS". This macro does the same thing as the previous button only it clears the results files listings starting in cell E17 and replaces them with all the results files now in your results folder.

Below the previous 2 macro buttons are 2 other macro buttons named: "DAILY PLAY?" and "WITH RESULTS?". If you do not want to load results for the race card you want to run, click the "DAILY PLAY?" button (a "1" will apear in cell E10, below the 2 buttons). If you have downloaded the results file for the race card you want to load and want to view those results, along with the race card data, click the "WITH RESULTS?" macro button (cell E10, below the 2 buttons, will be blank).
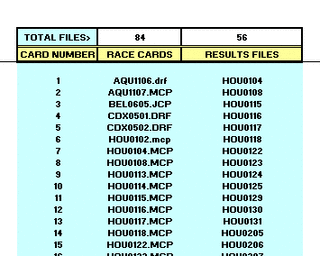
The above screenshot shows a list of your race card data files and your results data files. To the left of your "Race Cards" are "Card Numbers". These numbers identify your race cards. So, instead of typing in the race card and results files names, you only have to type the corresponding numbers.
NOTE: You only have to worry about the number for your Race Card(s), AllData will match them with their corresponding Results, if you are importing results.
To the right of "TOTAL FILES>" are the total number of "RACE CARDS" and RESULTS FILES" in your 2 data folders.
NOTE: You only have to worry about the number for your Race Card(s), AllData will match them with their corresponding Results, if you are importing results.
To the right of "TOTAL FILES>" are the total number of "RACE CARDS" and RESULTS FILES" in your 2 data folders.
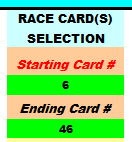
Directly below where it says "Race Card(s) Selection", you will see "Starting Card #" and "Ending Card #". The green box below each is where you tell Excel which race card(s) you want to import into AllData_J1 by typing in the "CARD NUMBER" corresponding to the race card(s) you want to import.
If you are importing only 1 race card, type the same card number in the green boxes, for both the "Starting Card #" and "Ending Card #".
In the above screenshot you will notice the number "6" has been typed into the "Starting Card #" box and "46" has been typed into the "Ending Card #" box. This means that the first 46 race cards (and results files) will be imported. This means we are going to utilize the "batch processing" mode.

For "batch processing" mode, you must tell AllData you want to batch process, by typing the number "1" into the green box below "Batch Process".
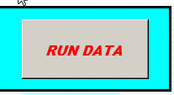
After you have completed all the above steps, you are ready to import your file or files. To do the import, click the "RUN DATA" button.
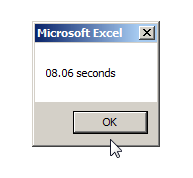
The import process takes about 6 or 7 seconds, per card, to complete, depending on the speed of your computer and the Excel version you are using (it could take several more seconds if your computer processor is not as fast as the better ones. Do not do anything, on the spreadsheet, until the small "timer" window pops up with the time it took to import the card or cards. When you see the timer window, it means the import is complete. Click the "OK" button in the timer window and it will disappear.
The import process takes about 6 or 7 seconds, per card, to complete, depending on the speed of your computer and the Excel version you are using (it could take several more seconds if your computer processor is not as fast as the better ones. Do not do anything, on the spreadsheet, until the small "timer" window pops up with the time it took to import the card or cards. When you see the timer window, it means the import is complete. Click the "OK" button in the timer window and it will disappear.
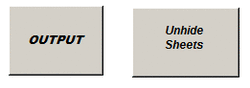
The "OUTPUT" button will be discussed later, but basically, this button sends the processed race card(s)/results to a file, in your Results folder. The file is named "ZZOUTPUT.xls". This file stores your processed data until it is imported by the Database. However, you can open the file, in Excel, and you'll see all your saved, processed race cards and results data.
We will discuss this more, in the Database's "Help" documents located on the "AllDataBase Help Document sub-tab, "AllDataBase" tab.
The "Unhide Sheets" button does just that, it unhides worksheets that are not normally shown in the tabs at the bottom of the spreadsheet window. The sheets that are hidden are sheets 2,7,8,and 9. These are sheets that the user normally would not have much interest in seeing. They are used for calculations, sorting, storage, etc.
Once you have closed the timer window, you are ready to work with the imported data. To get to that imported data, click the "GO TO ALLDATA" button. This will take you to the "AllData" worksheet.
The "AllData" worksheet

Selecting races and viewing race data and results
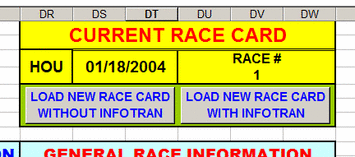
This screenshot should look familiar to current users of AllData PPs. This is the "Current Race Card" and "Race Selection" area of the workbook. Directly below "CURRENT RACE CARD" is the imported race card track code, date, and race number (if you have not yet selected a race to view, this race number will be blank or the number of the last race you viewed, from the last race card you imported).
Below this area you will see 2 macro buttons, "Load New Race Card Without Infotran" and "Load New Race Card With Infotran". The first button takes you back to the "Main" worksheet where you can select a new race card to import. The second button allows you to use the previous method of importing a race card into AllData, via "Infotran".
Note: The "Load New Race Card With Infotran" button has been removed in the "AllData_J1" version of the workbook, as our "Beta" testing period has been completed and there is no need for using "Infotran" any longer.

The "General Race Information" area gives you a list of all races on the card, with Race #, # of horses, race classification, and distance.
Note: I have added, in AllData_J1", a new column to the right of the race distance column which tells you what surface each race will be run on, "Dirt" or "Turf"
Note: I have added, in AllData_J1", a new column to the right of the race distance column which tells you what surface each race will be run on, "Dirt" or "Turf"

The "Race Selection" box allows you to select individual races to view/handicap. Just click the button to the left of the race you want to see, and that race will be separated from the card allowing all the views to show that race's data. Once a race button is clicked you are taken to the "Past Performances" view of that race.
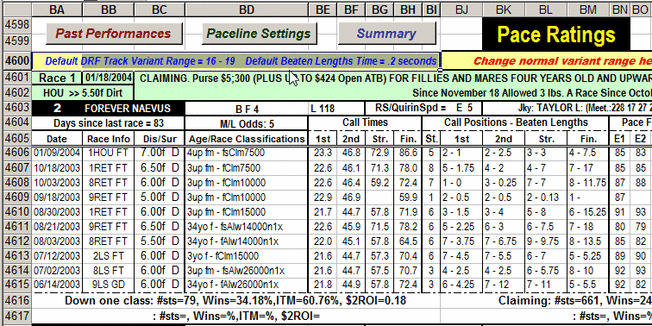
The "Past Performances" view

Here is a view of the left side of the "Past Performances" view, the format is almost a mirror of the traditional "Daily Racing Form", except using Bris, TSN, or JCapper/HDW data.
There are 4 navigational buttons in this view:
The "New Race" button takes you back to the "Race Selection" area for selecting a different race or for navigating back to the "Main" page for importing a new race card.
The "Pace Ratings" button takes you to the "Pace Ratings" view, a Sartin type velocities readout.
The "Paceline Settings" button takes you to the area of the sheet where you can set the criteria for AllData's "auto-paceline selection" method. (The screenshot of this view is shown and discussed further down this page)
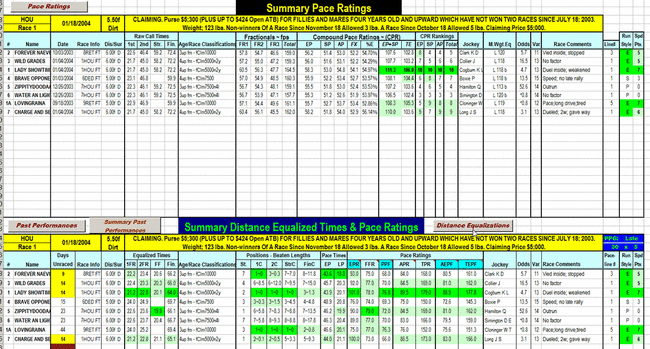
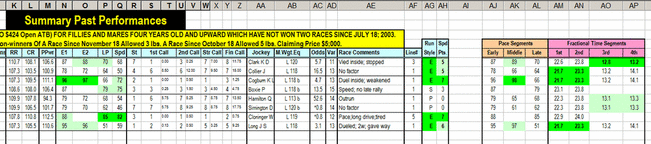
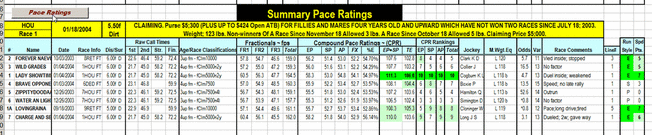
The "Summaries" button takes you to the "Summaries" page where you can view 3 different summaries, showing all the race's horses and their respective "auto-selected" paceline data. The 3 summaries are: "Summary Past Performances", "Summary Pace Ratings" and "Summary Distance Equalized Times and Pace Ratings". This is also the worksheet where the results can be viewed, if you have imported them, the results are just to the right of the "Summary Pace Ratings". Additionally, the "Pace Picture" and "Black Box Picks" views can be seen on this worksheet, they are both to the right of the 3 "Summaries" and the results areas.
There are 4 navigational buttons in this view:
The "New Race" button takes you back to the "Race Selection" area for selecting a different race or for navigating back to the "Main" page for importing a new race card.
The "Pace Ratings" button takes you to the "Pace Ratings" view, a Sartin type velocities readout.
The "Paceline Settings" button takes you to the area of the sheet where you can set the criteria for AllData's "auto-paceline selection" method. (The screenshot of this view is shown and discussed further down this page)
The "Summaries" button takes you to the "Summaries" page where you can view 3 different summaries, showing all the race's horses and their respective "auto-selected" paceline data. The 3 summaries are: "Summary Past Performances", "Summary Pace Ratings" and "Summary Distance Equalized Times and Pace Ratings". This is also the worksheet where the results can be viewed, if you have imported them, the results are just to the right of the "Summary Pace Ratings". Additionally, the "Pace Picture" and "Black Box Picks" views can be seen on this worksheet, they are both to the right of the 3 "Summaries" and the results areas.
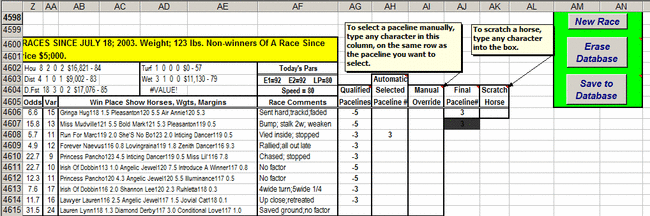
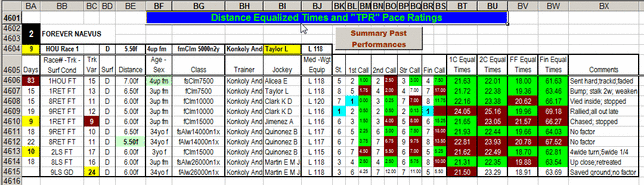
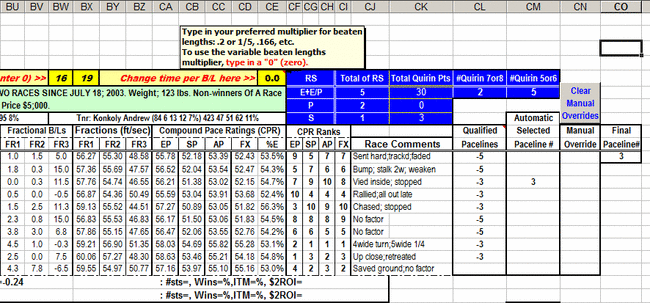
The right side of the "Past Performances" view shows, in the "Qualified Pacelines" column, which pacelines best match your "auto-paceline selection" criteria (1 is an exact match, -1 is a match of the 5 most important criteria categories, -2 is a match of the 4 most important criteria categories, etc.). If there are no matches of any of your criteria categories these cells will be blank.
The next column, the "Automatic Selected Paceline #" column, shows the paceline that has been chosen by the "auto-paceline selection" method. It picks the highest numbered, most recent paceline from the "Qualified Pacelines" column, and enters that paceline number in that cell. The screenshot shows that the 3rd most recent paceline has been chosen.
The next column is the "Manual Override" column. This is where the user can override any of AllData's auto-paceline selections, simply by typing any character in that column, on the same line as the paceline you want to use. So, if you want to choose the 4th most recent paceline, instead of the 3rd, just type any character (I use the "X" key on my keyboard) in the column, on the same row as the 4th paceline data.
The "final Paceline#" column shows the paceline # that will be seen in the "Summaries" views. If you override the auto-paceline selections, that manually selected paceline # will appear here, otherwise AllData's auto-selected paceline # appears.
The "Scratch Horse" column is where the user can scratch horses, from the "Summaries" views. To scratch a horse from the "Summaries" views just type any character in the box below "Scratch Horse". You can use this for actual, track officials, scratches, or you can use it to show only horses you want to see in the "Summaries" views. If there are horses that you want to disregard, as contenders, just scratch them and their data won't appear in the "Summaries" (a perfect way to view only your contenders, together).
The "New Race" button takes you back to the "Race Selection" area for selecting a new race to view.
The "Erase Database" button erases the data on the "Data" worksheet, in cells BW31 thru EV31. This is the data that is saved to the "ZZoutput.xls" file, for import by the database.
The "Save to Database" button is used when you are manually selecting pacelines and/or manually scratching horses and want to save that data to the "ZZoutput.xls" file, for import by the database, rather than using the auto-paceline selection method, like in the "batch processing" mode. When using this "Save to Database" method, you must save one race at a time. We'll be discussing this more in the "AllDataBase Help Documents".
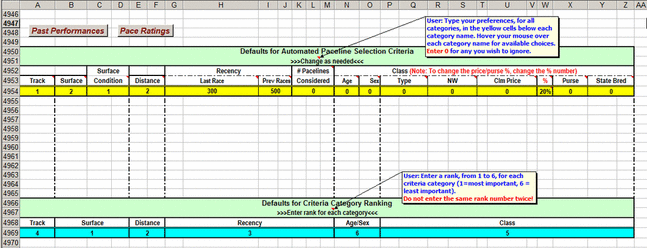
Before we leave the "Past Performances" view, let's go back to the "Paceline Settings" button. Click it and the above view will appear. This is where you set your criteria/preferences, and, your category ranking preferences for the "auto-paceline selection" method.
In the top portion of the view is the criteria settings. Read the visible comment pointing to the ">>>Change as needed<<<" cell. Each of the column headings/names have hidden comments in the cells, explaining how to make the setting for that criteria, just hover your mouse curser over the cells with the red triangle in the top-right corner and the comments will pop up. Follow the instructions in the comments to make your settings.
In the bottom portion of the view is the criteria category rankings settings. You will notice that the criteria settings in the top portion of the view have been grouped by the 6 categories in the bottom portion of the view. Read the visible comment pointing to ">>>Enter rank for each category<<<". Your most important category should have a "1" typed in it, your 2nd most important category should have a "2" typed into it, etc..
This all creates a code for each paceline, which are then compared to the code for today's race. The closest match, in category rankings and criteria, is used as the "auto-paceline selection" paceline. If there are no matches then the method uses the horse's most recent race/paceline.
Once you have experimented with these settings and have found a "set" that you like, "Save" the workbook. Once saved these settings will remain until you change them again and "Save" the workbook again.
The "Past Performances" and "Pace Ratings" buttons take you to those views.
Click the "Pace Ratings" button and scroll down to the next screenshot.
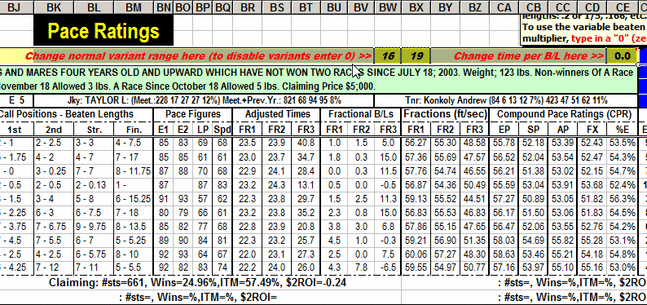
The "Pace Ratings" view
The "Pace Ratings" view is similar to the "Past Performances" view, but, not only the fractional times are shown here, but also, their resulting velocities, or average speeds, in feet per second, not unlike your car's speedometer readings, in miles per hour. Note that these fps (feet per second) speeds are AVERAGE SPEEDS for the 3 sections of the race, the start to 1st call, 1st call to 2nd call, and 2nd call to finish. Keep in mind that horses vary their speeds during each of these sections, which affects their energy expenditures and their energy reserves for the remainder of the race. These velocities are shown in the next screenshot.
Notice that just below the 3 navigational buttons there is a highlighted section stating the default track variant range (16 - 19) and the default beaten lengths multiplier (.2, or 1/5, seconds).
The track variant used by AllData is the DRF daily track variant, supplied in Brisnet and JCapper/HDW data files. The "TSN" data files, which were available prior to Brisnet taking over that data file when TSN was discontinued, do not include the DRF variant and therefore, there is no adjustment to raw times by the variant, for "TSN" data files. The "Track Variant Range" is the range of variants that is considered to be "normal" for the track. These "normal" variants require no adjustment in the raw times. If the variant falls outside this normal range, an adjustment is made, either slower or faster, to the raw times. Each variant point above or below the normal range equals 1 length. The amount of time, per length, is determined by the "beaten length multiplier" you have selected. If you use the default multiplier (.2 or 1/5 second) then 1 point faster or slower than the normal variant range will result in .2 (or 1/5) second being added or subtracted from the raw times.
Both the "normal variant range" and the "beaten length multiplier" can be changed by the user. The changes can be made as shown in the next screenshot.
The 3 navigational buttons in the top-left of the screenshot, when clicked, will take you to the respective views named on each button.
Below the pacelines you will see up to 6 trainer statistics that apply to this particular race or horse.


I am not going to go through all the instructions for previous versions of AllData PPs because some of those instructions are available in the "Help" file on the AllData page of this website, so, if you have not read the help file for previous versions, please do.
The above screenshot shows the location of the results data for the race card you have imported (if you have downloaded the results file and selected to view it, on the "Main" worksheet.
As you can see, the results data is located directly to the right of the "Summary Pace Ratings" view, on the "Summaries" worksheet.
Here you will see the horses and their saddle cloth numbers listed in the same order as the "Summary Past Performances" and the "Summary Pace Ratings". Next to each horse, who finished in the money, are their win, place, and show payouts. To the right of these payouts is a column that shows scratched horses, designated with a "1". Next to that column is a column showing each horse's final odds. To the right of this area is the Race Status, "RUN" means the race has been run, "Canceled" means the race was canceled and not run due to weather or other circumstances. Next to that is the track condition for that race. Below these 2 areas are the exotic payouts and the exotic finishers' saddle cloth numbers.